
Creating and Naming Entities
| Statement | What it does | Example |
|---|---|---|
CREATE | Create a new entity, optionally at a location | CREATE Order · CREATE Box AT "Packing" |
NEWNAME | Rename the current entity | NEWNAME "Rush" |
NEWGRAPHIC | Change only how the current entity looks | NEWGRAPHIC("Hard Call") |
CREATE makes an independent entity that flows on its own; use it to model an order raising a document, a machine producing scrap, or one arrival triggering several downstream items. To create only under a condition, put it inside an IF:
// Raise a rework entity at the repair bench, but only for a defectIF a_Defect = 1 THEN CREATE Rework AT "Repair"ENDIFNEWNAME renames the current entity to another entity type defined in the model, so it takes on that type’s name. A name that is not a defined entity type is skipped: the message reads NEWNAME ... does not match any defined EntityTypeName; rename skipped, and the entity keeps the name it had.
// Rush is an entity type in the modelIF a_Late = 1 THEN NEWNAME "Rush"ENDIFThe name can carry live values in braces, which are filled in before the name is looked up. NEWNAME "Tier_{a_Level}" reads Tier_2 when a_Level is 2. The result must still be the name of a defined entity type, so the model needs an entity type called Tier_2 for the rename to happen:
// Tier_1, Tier_2 and Tier_3 are entity types in the modelNEWNAME "Tier_{a_Level}"NEWGRAPHIC changes only how the entity looks. It paints the entity as another entity type that is already on the layout, and leaves its real name, its counts and its exit statistics as they were. Give the type’s name in quotes:
// Show a hard call with the Hard Call picture; it stays the same entity underneathIF a_Hard = 1 THEN NEWGRAPHIC("Hard Call")ENDIFA later NEWNAME, or a route that renames the entity, takes the look back to the entity’s own type. A name that is not an entity type on the layout is reported, and the look does not change.
LegacyHow this worked in the previous version
One or more new entities are created or split off from another entity at an activity. (The values of any user-defined attributes are the same as those of the entity that triggered their creation.)
Suggested Technique
Section titled “Suggested Technique”-
Define a routing from the activity where the creation occurs (this is the routing to be used for all entities created by the activity).
-
Select the connection and choose Create from the Type list in the properties dialog.
-
Enter the name of the newly created entity in the Created entity name field.
-
When you add an additional text label to an entity, place the label on the center of the entity. Otherwise, the entity will appear larger during simulation.
-
In the Entities to be created field, enter the quantity of entities the activity will create for each entity coming into the activity.
-
Define another routing from the activity to route the original incoming entity. (If no other routing is defined, the original entity will exit the model.)
** Example**: See the example on Reuniting Entities.
- To learn more about creating entities, see Create.
Creating entities under conditions
Section titled “Creating entities under conditions”Creation of a new entity occurs only under certain conditions. You can control whether or not an entity is created or the quantity of created entities to suit changing conditions.
Suggested Technique
Section titled “Suggested Technique”- In the create route, replace the quantity created with an attribute, variable, expression or distribution.
Example: A company receives telephone calls, 25 percent of which turn into orders and 75 percent which do not. In either case, calls must be logged and terminated.
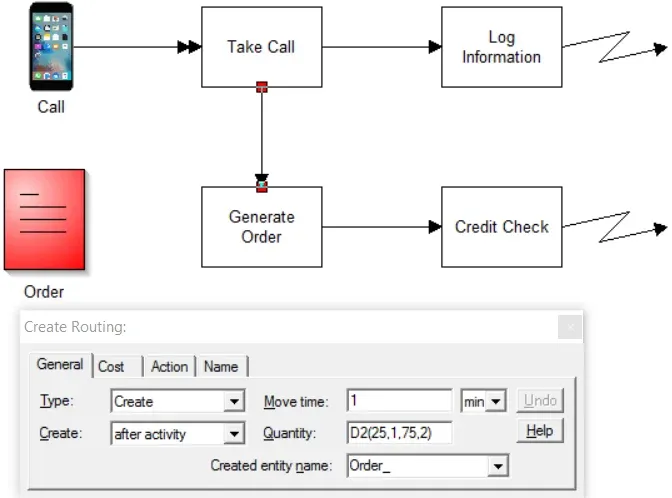
TO DO: Place a discrete distribution in the quantity field of the Create routing. See Discrete Distribution.
NEWNAME statement
Section titled “NEWNAME statement”This statement allows you to change the name of an entity along with its graphic so that model animation as well as statistical reports will reflect the change. In effect, this statement reassigns the entity the name enclosed in parentheses and changes the graphic i.d. number appropriately.
Syntax
Section titled “Syntax”TkVXTkFNRShuYW1lKQ==
**name **The new name assigned to the entity with its accompanying graphic if defined on the layout. The new entity and its graphic must be previously defined on the layout when using this statement.
Example
We want to see completed orders as a different graphic and collect statistics on the completed orders, so we use the NewName statement on the entity named Order. At the activity or connection where the change takes place, enter the following in properties dialog Action logic:
TkVXTkFNRShDb21wbGV0ZWRfT3JkZXIp
An entity can be renamed using either the New Name drop down list in a routing Properties Dialog Box, or the NEWNAME statement in action logic. When renaming, all attributes from the original entity are inherited except the system created attributes ID and Name. The system created attributes which are inherited are Cost, CycleStart, and VATime.
[
Logic Statements](/help/statements/)
NEWGRAPHIC statement (legacy)
Section titled “NEWGRAPHIC statement (legacy)”This statement allows you to change an entity’s graphic without changing the name of the entity. The NEWGRAPHIC statement will permit you to graphically depict a change in an entity’s state without affecting the statistics collected for the original entity. The NEWGRAPHIC statement allows depiction of:
-
assembly, by adding to the complexity of graphics
-
value or size change, by increasing the size of the graphics
-
exception tracking, by changing the color of the graphic.
For more information, see Finding Graphic ID Numbers.
Syntax
Section titled “Syntax”TkVXR1JBUEhJQyhpZCMp
id# The identification number of the new entity graphic you want to use in the animation. Numbers (1-20) are pre-assigned to the entities in the standard entities shape palette. When you place entity graphics on the layout, ProcessModel adds them internally as graphic number 21, 22, 23, … and so on.
Example
Suppose you want a completed order to appear with a different graphic. To do this, you would use the NewGraphic statement for the entity (e.g. Order) to change its ID from 21 to 22 (this will substitute a new graphic for the original). At the activity or connection where the change takes place, enter the following statement in the Action logic:
TkVXR1JBUEhJQygyMik=
Logic Statements](/help/statements/)
ANIMATE statement (legacy)
Section titled “ANIMATE statement (legacy)”The ANIMATE statement allows the control of the animation speed through the action logic dialog. This statement is especially useful when preparing a model to show specific behaviors.
Syntax
Section titled “Syntax”QU5JTUFURShzcGVlZCk=
**speed **A numeric value between 0 and 100. One is the slowest and one hundred is the fastest speed of animation. A speed of zero turns the animation off.
Example
In the first example, the ANIMATE statement is used to turn the animation off so that the model will run ahead in time quickly. In the second example the speed of the animation is set very slow (usually to show a particular entity or activity). In the third example the speed of the animation is set to the highest possible speed with animation still on (often used to help the user gain a “feel” for the general flow and buildups that would occur over time.
-
animate(0)
-
animate(10)
-
animate(100)
The ANIMATE statement is usually implemented by placing a separate entity, arrival, and activity combination in the existing model. This model segment may be placed at any location on the layout. Placing the segment on a separate layer allows hiding the layer and model segment from view.
In the example above, a single periodic arrival (time between arrivals set to zero) arrives at zero time. Immediately the action logic starts. The animation shuts off and runs instantly to 8 hours. After eight hours the animation speed becomes 20. The speed depends on the number of items concurrently in the simulation, so experiment to achieve the correct speed for your purpose. The simulation runs for another 9 hours then turns the animation off and runs until completion. Modify the example to change the animation results for you particular purpose.
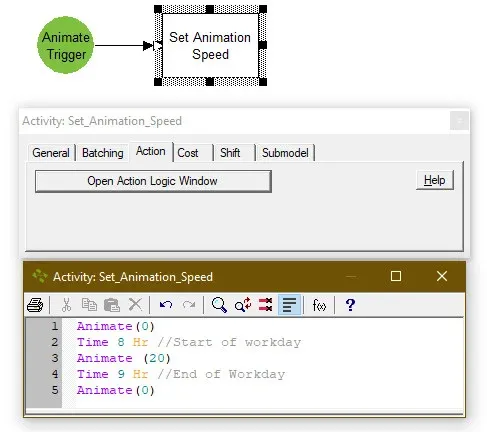
Control the speed of the animation using the ANIMATE statement.
Logic Statements](/help/statements/)