
System Values
System values report the state of the run as a whole, rather than any one entity or object.
| Function | What it returns |
|---|---|
CLOCK | The current simulation time, in minutes. With a warm-up it counts from the start of the warm-up, so it already reads the warm-up length when the simulation bar reads 00:00:00. |
CLOCK(unit) | The same time in a unit you name: Sec, Min, Hr, Day or Wk. CLOCK(Hr) reads hours. |
WIP("Activity") | The work in process: entities at a named activity, or across the whole model with no name. |
ENTITYCOUNT("Type") | How many entities are in the model now, optionally of one type. |
EXITCOUNT("Type") | How many entities have left the model, optionally of one type. |
RAND(low, high) | A random number between low and high; RAND() alone gives a value from 0 up to 1. |
WIP, ENTITYCOUNT, and EXITCOUNT all take an optional name in quotes. Leave the parentheses empty and they cover the whole model.
An example of each
Section titled “An example of each”Each line below is a complete piece of action logic, with a // note saying what it does.
The clock:
// Store the simulation time now, in minutesSET a_StartTime TO CLOCK
// Later in the model, work out how long the entity has taken to get hereSET a_Elapsed TO CLOCK - a_StartTime
// The simulation time now, in hoursSET a_HoursIn TO CLOCK(Hr)
How much work is in the model, and how much has been through it:
// Entities at one activity, then across the whole modelSET a_Load TO WIP("Assembly")SET v_TotalWip TO WIP()
// Entities in the model right now: every type, then just ordersSET v_InModel TO ENTITYCOUNT()SET v_OrdersIn TO ENTITYCOUNT("Order")
// Entities that have finished and left: every type, then just ordersSET v_Finished TO EXITCOUNT()SET v_OrdersOut TO EXITCOUNT("Order")
A random draw:
// A value between 1 and 6, decimals included, 6 itself never drawnSET a_Extra TO RAND(1, 6)
// With nothing in the parentheses, a value from 0 up to 1SET a_Chance TO RAND()
RAND returns a decimal, so wrap it to get whole numbers: TRUNC(RAND(1, 7)) gives 1 through 6.
LegacyHow this worked in the previous version
Clock() function
Section titled “Clock() function”-
Clock(min)
-
Clock(sec)
-
Clock(hr)
-
Clock(Day)
-
Clock(Wk)
Syntax:
Section titled “Syntax:”Q0xPQ0soICkgb3IgQ0xPQ0sodGltZSB1bml0KQ==
Example:
Section titled “Example:”YV9UaW1lID0gQ2xvY2soICkKdl9UaW1lX2luX1N5c3RlbSA9CkNsb2NrKCApIOKAkyBDeWNsZVN0YXJ0CklmIENsb2NrKEhyKSA+IDI0ClRoZW7igKY=
The default clock function returns the elapsed time of the simulation clock in minutes. It can be accessed, but not assigned a value. For example a variable could be assigned the value of the clock in minutes: v_Var1 = Clock() would result in the number of minutes elapsed in the simulation assigned to the variable. To assign the number of hours that have elapsed, use v_Var1 = Clock(hr), and to get the number of seconds, use v_Var1 = Clock(sec).
More Information
A common use of the Clock( ) function is collect and plot individual cycle times for entities. It can be used to help collect individual times in just part of the model or individual entities for the entire cycle time. Why would this be important? Doesn’t ProcessModel automatically collect and report the average cycle time for each entity type? Yes it does, but a major reason for simulation is to dig deeper than averages, because averages are misleading.
ProcessModel automatically notes the simulation clock time when each entity first enters the process and writes that information to a default entity attribute called CycleStart. You can use a formula below calculate and record the processing time for each entity.
Example: v_Time = Clock() - CycleStart
Each entity that crosses the action statement that contains this formula will find out the current simulation time, subtract the starting time of the entity and write the result to variable defined (in this case, v_Time).
Many times, however, it is helpful to know the time it takes for an entity to complete only a portion of the process, for example activities 4 to 6 of a larger process. In this case, you would enter a_attribute1 = clock() in the action logic of the route entering activity 4. [Not specifying a unit of time by not putting anything in the parentheses after “clock” causes ProcessModel to use the default time unit which is minutes.] This would cause ProcessModel to note the time that each entity enters activity 4. You would also enter v_variable1 = clock() - a_attribute1 in the action logic of the route leaving activity 6. This would cause ProcessModel to take a new clock reading, subtract from it the first clock reading, and write to a variable that reflected the difference which you could then track in your output reports.
- If you change the default time units to hours, then the value returned will be divided by 60. If you change the default time units to seconds, then the value returned will be multiplied by 60.
[
Functions
](/help/functions/)
Calculate elapsed time
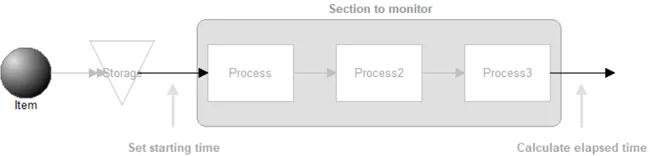
Section titled “Calculate elapsed time”When you want to calculate how long an entity spent between two points in your model. By capturing the elapsed time to a variable, you can plot the results in a Time Series plot (as shown after simulating this model object).
Where to Find the Model Object
Section titled “Where to Find the Model Object”The following model object can be found in the model objects directory:
- Reporting - Calculate Elapsed Time
Difficulty Level
Section titled “Difficulty Level”- Ease of Use: Easy
- Ease of Modification: Easy
How to Use the Model Object
Section titled “How to Use the Model Object”-
Open Your Model: Open your model or create a new blank model.
-
Insert the Model Object into Your Model
-
Locate the model object Calculate Elapsed Time and select the insert button.
-
Move the cursor to the point of insertion and left mouse-click. The upper left corner of the **model object **will be inserted at the location of the mouse-click.
-
Connect to Your Model: You should see two percentage route routes copied to your model a route to the left and a route to the right.
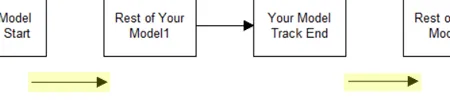
- Connect the arrival part of the percentage route on the **left **to the part of your model where you would like to start collecting time information / start tracking time.
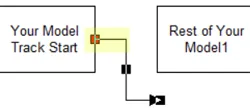
- **Connect **the exit part of the percentage route on the **left **to the rest of your model.
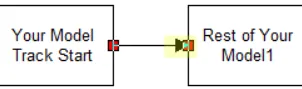
- **Connect **the arrival part of the percentage route on the **right **to the part of your model where you would like to stop collecting time information / stop tracking time.
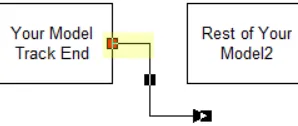
- **Connect **the **exit part **of the percentage route on the **right **to the rest of your model.
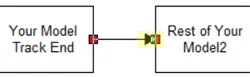
The location of the action logic used in this model object can be moved to any location you like. For example, you could assign the start time in an activity and calculate the elapsed time in another activity. Just be aware that in this case, the start time will begin “after” the entity has left the input queue of the first activity. Therefore, any waiting time in the input queue will not be included in the elapsed time.
If you calculate the elapsed time in an activity rather than on the route leaving it, make sure you use a TIME statement in that activity’s action tab because any time assigned on the General tab for that activity will occur “after” the action logic has been executed. Also be aware that, in this case, the calculation will occur “before” entering the activity’s output queue (if you have one assigned).
-
Review Output Report
-
Simulate the model.
-
**Open **the Output Report for information on v_Elapsed_Time1 variable.
-
**Export **the variable data by clicking the Variable icon that will Export Variable Report to Excel.
-
**Choose **the **location **where you would like the Excel file to be saved.
-
**Choose **the **variables **you would like to export and click OK. Goto the location chosen at step 4.3.1 and open the Excel file. The reason for using Output Report for exporting variable data is that ir can export more than one million rows of data (Excel limitation), while Output Detailed Report can only export upto 16,382 rows.
-
**Open **the Output Detailed Report, click the Generate a time series plot icon, add **v_Elapsed_Time1 **to Selected Values and then click OK.
- Completion: The model object is now integrated into your model, you should now be able to save and then simulate the model.
Controls Usage
Section titled “Controls Usage”Attributes:
Section titled “Attributes:”- a_Start: Do not change.Simulation clock time when the entity enters the Process activity.
Variables:
Section titled “Variables:”- v_Elapsed_Time1: Do not change. The difference between the current simulation clock time and the start time.